


Introduction
In the previous article, we deployed an API as a docker container on AWS EC2. In the current article, we are going to deploy a simple website on AWS without the backend (so next we can add it 😉). We will distribute the content using AWS S3 and AWS CloudFront (content delivery network service). As a frontend will be used an open-source Start Bootstrap example with an MIT license. Everything we deploy in the article is supported by AWS free tier. All the code related to the article can be found in GitHub repo.
Important notes
We are going to simplify some parts of the system to improve it in other articles. Because of these simplification current code is not recommended to use for production system as is and need to be improved. Some of the important simplifications that we use:
- Content type serving was done as a simple map with the default
text/htmp; charset=UTF-8value. - We serve much more files that need to be served so some extra files are exposed.
- We don’t encrypt buckets and don’t have versioning to simplify removing the bucket.
- Usage of the default CloudFront certificate is not recommended as it uses an old SSL version. In production system should be used an ACM certificate.
As we don’t have any backend we are not going to use AWS WAF as the most useful thing it can do here is bot protection. It will be overhead for the simple static website. CloudFront already provides a decent level of level 3 and 4 DoS attacks.
Prerequisite
In the article, we are going to use terraform and need to have an AWS account. If you don’t have them installed and want to try to deploy everything by yourself you can find the installation instruction in the first article.
Code
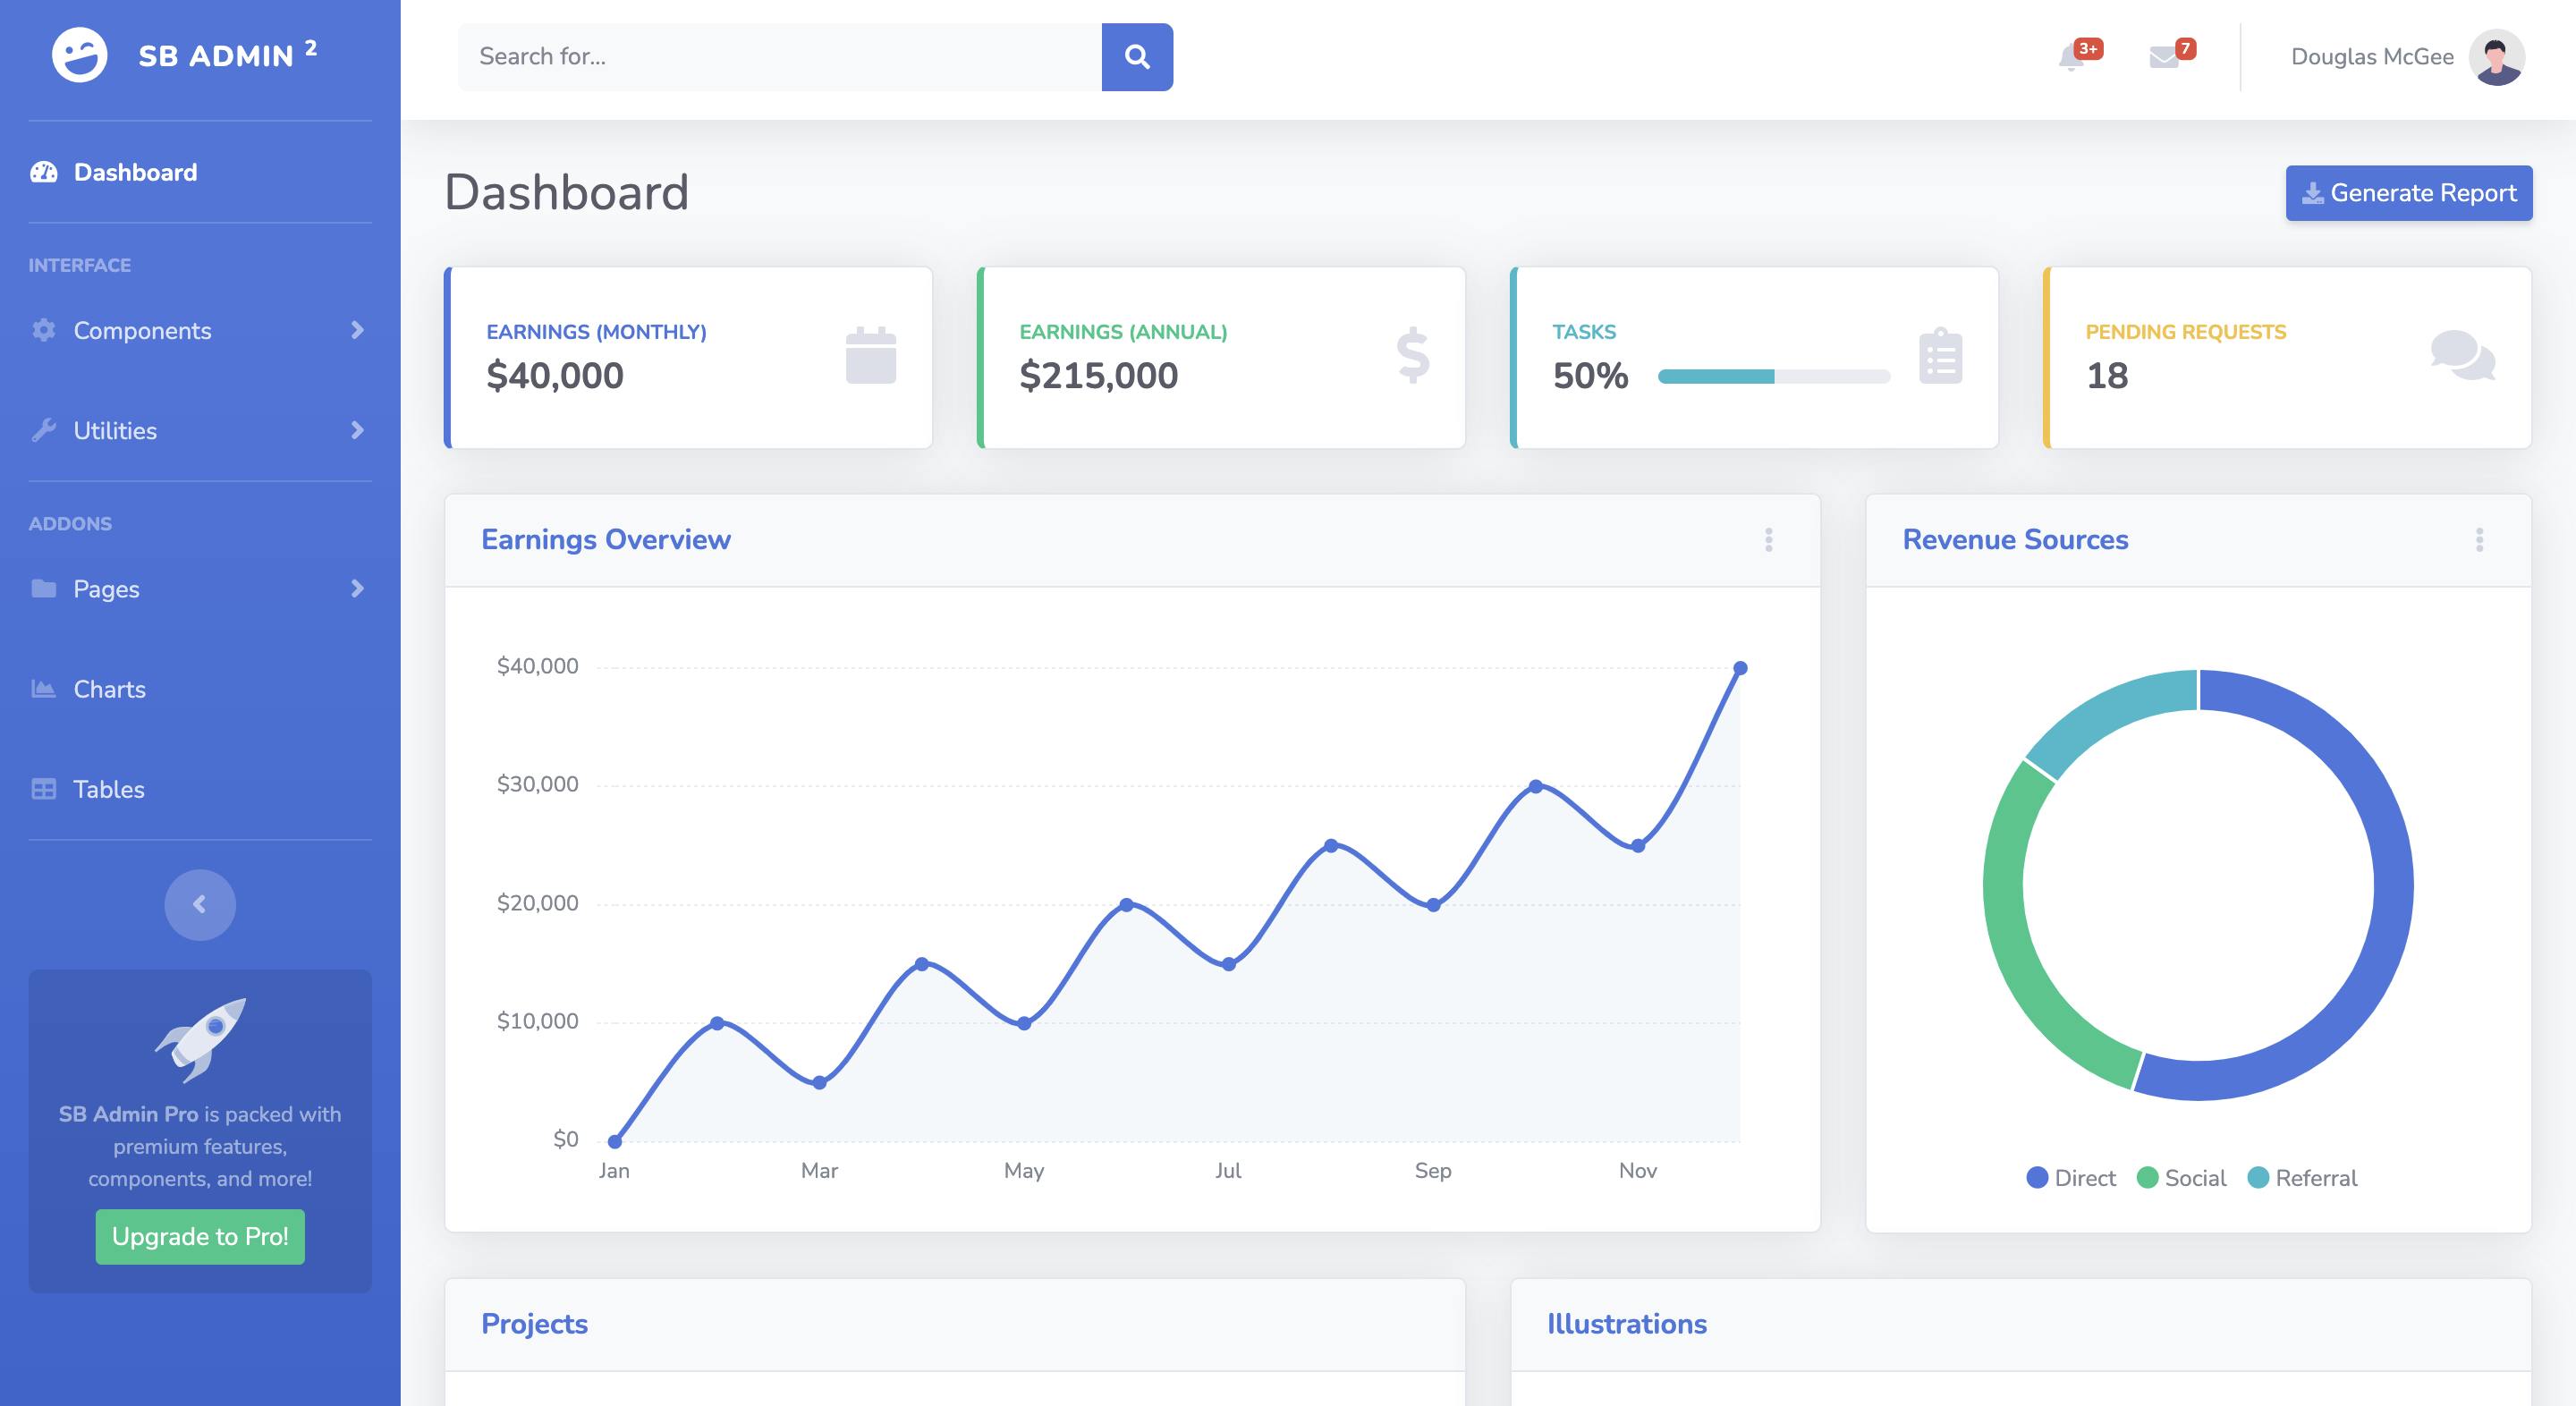
For the frontend we use an example of an admin dashboard made with bootstrap. It is an MIT-licensed open-source project that can be found in the GitHub repo.
Overview
The basic architecture of the project is described in the diagram.
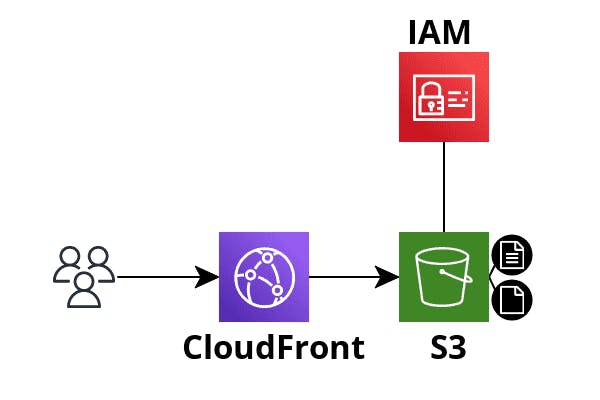
We are going to upload all our website files to AWS S3. To serve the website we will use AWS CloudFront to reduce latency and provide a caching layer for the static content. To protect the access to S3 objects we are going to use IAM so the object can be accessed by customers only through CloudFront. The main components we will review are:
CloudFront - an AWS content delivery network (CDN). We are going to use it to serve our website and reduce latency to provide a good user experience.
AWS S3 - storage for all the static data. The bucket is blocked for all public access and the objects could be accessed only from CloudFront.
Deploy and distribute static content
S3
As we described before, there are 2 important parts we need. First is our S3 bucket, that we need to create:
resource aws_s3_bucket static {
  // important to provide a global unique bucket name
  bucket = "boodyvo-go-example-static"
}
To make the bucket private and remove all potential access (except AWS God account access), we need to update the bucket:
resource aws_s3_bucket_acl static {
  bucket = aws_s3_bucket.static.id
  acl    = "private"
}

resource aws_s3_bucket_public_access_block website_bucket_public_access_block {
  bucket                  = aws_s3_bucket.static.id
  ignore_public_acls      = true
  block_public_acls       = true
  restrict_public_buckets = true
  block_public_policy     = true
}
Another thing that is recommended to do is to enforce bucket ownership for all objects that are added to the bucket. It will disable ACL usage so the bucket always has full control over objects and manage access to them via privileges.
resource aws_s3_bucket_ownership_controls meta_static_resources {
  bucket = aws_s3_bucket.static.bucket

  rule {
    object_ownership = "BucketOwnerEnforced"
  }
}
To serve our website from S3 we need to upload all files that we have we need to upload all of them first. Based on our project structure, we are going to upload all the files in frontend/ directory using fileset terraform function. It’s important for serving the files via browser to provide a correct content_type. As mentioned in a simplification part at the beginning, we are going to provide a content_type based on simple mapping where "text/html; charset=UTF-8" is a default value. The map is represented with content_type_map local variable.
locals {
  content_type_map = {
    css:  "text/css; charset=UTF-8"
    js:   "text/js; charset=UTF-8"
    svg:  "image/svg+xml"
  }
}

resource aws_s3_bucket_website_configuration static {
  bucket = aws_s3_bucket.static.id

  index_document {
    suffix = "index.html"
  }

  routing_rule {
    redirect {
      replace_key_with = "index.html"
    }
  }
}

resource aws_s3_object assets {
  for_each = fileset("${path.module}/../frontend", "**")

  bucket = aws_s3_bucket.static.id
  key    = each.value
  source = "${path.module}/../frontend/${each.value}"
  etag   = filemd5("${path.module}/../frontend/${each.value}")

  // simplification of the content type serving
  content_type = lookup(
    local.content_type_map,
    split(".", basename(each.value))[length(split(".", basename(each.value))) - 1],
    "text/html; charset=UTF-8",
  )
}
Note: That is enough for the example project, but for production project map could be way more granular or the dist can be more specified based on paths. If we don’t control the object upload process via Lambda@Edge or Lambda functions during uploading the file on S3 depends on the content. Moreover, we need to filter out dev files, like .scss, license, readme, etc
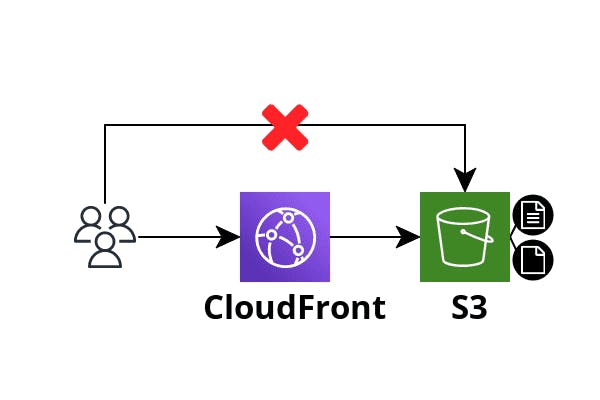
Another thing we need to do to make it possible to serve our content using CloudFront is to create an Origin Access Identity (OAI). It is a policy that restricts access to the bucket so only CloudFront can access objects. In such a way the end user can access the objects only through CloudFront and cannot bypass it.
// --- cloudfront.tf ---

locals {
  s3_origin_id = "s3-origin-example"
}

resource aws_cloudfront_origin_access_identity frontend {
  comment = "OAI for S3 frontend"
}

// --- s3.tf ---

data aws_iam_policy_document oai_access_policy {
  statement {
    actions   = ["s3:GetObject"]
    // as we use the bucket only for static content we provide an access for all objects in the bucket
    resources = ["${aws_s3_bucket.static.arn}/*"]

    principals {
      type        = "AWS"
            // the identity specifies in cloudfront.tf
      identifiers = [aws_cloudfront_origin_access_identity.frontend.iam_arn]
    }
  }
}

resource aws_s3_bucket_policy oai_access {
  bucket = aws_s3_bucket.static.id
  policy = data.aws_iam_policy_document.oai_access_policy.json
}
One more thing we are going to simplify is related to CORS, as we will provide a possibility to access our website from everywhere by allowed_origins = ["*"].
resource aws_s3_bucket_cors_configuration website {
  bucket = aws_s3_bucket.static.id

  cors_rule {
    allowed_headers = ["*"]
    allowed_methods = ["GET"]
    allowed_origins = ["*"]
    expose_headers  = []
    max_age_seconds = 3600
  }
}
CloudFront
CloudFront provides a possibility to create a distribution, that configures how the content should be distributed and served. In such a way we control geo-restrictions, caching rules, request redirection rules, security, access, etc. We are going to create a distribution.
resource aws_cloudfront_distribution frontend {
  origin {
    domain_name = aws_s3_bucket.static.bucket_regional_domain_name
    origin_id   = local.s3_origin_id

    s3_origin_config {
      origin_access_identity = aws_cloudfront_origin_access_identity.frontend.cloudfront_access_identity_path
    }
  }

  enabled             = true
  is_ipv6_enabled     = true
  comment             = "Distribution for example website"
  default_root_object = "index.html"

  aliases = []

  default_cache_behavior {
    allowed_methods  = ["GET", "HEAD", "OPTIONS"]
    cached_methods   = ["GET", "HEAD"]
    target_origin_id = local.s3_origin_id

    forwarded_values {
      query_string = false

      cookies {
        forward = "none"
      }
    }

    viewer_protocol_policy = "redirect-to-https"
    min_ttl                = 0
    default_ttl            = 3600
    max_ttl                = 86400
  }

  price_class = "PriceClass_100"

  viewer_certificate {
    cloudfront_default_certificate = true
  }

  restrictions {
    geo_restriction {
      restriction_type = "none"
    }
  }

  wait_for_deployment = true
}
There are several places that we can pay attention to in this distribution resource:
price_class = "PriceClass_100"represents the Price Class of the distribution. In other words, it specifies where the content is cached and served. We chose the most simple option when we serve the data in North America, Europe, and Israel. To make it more distributed we can upgrade the class and cover many more regions.aws_cloudfront_origin_access_identityspecifies the OAI that we described before in the S3 section. The identity will provide an access to S3 bucket objects to CloudFront distribution.viewer_protocol_policy = "redirect-to-https"configure redirection of HTTP requests to HTTPS to force HTTPS connection.viewer_certificate {cloudfront_default_certificate = true}configures the default CloudFront certificate. It is not recommended to use it for production because of security reasons, as it is used in the old version of the TLS protocol.
Except for those important points we also specified cache behavior, geo-restriction, and default index page.
We want to have a URL of the distribution as an output to use it to test our website:
output service_ip {
  value = aws_cloudfront_distribution.frontend.domain_name
}
Deploying
To deploy everything we need to run from the directory 2_static_website:
terraform -chdir=iaac init  # initialization of terraform modules
terraform -chdir=iaac apply # applying the resources
The distribution takes can take about 20 minutes to be created. After that we will have an output with a host_name value, that represents the URL of the website.
Apply complete! Resources: 0 added, 0 changed, 0 destroyed.

Outputs:

host_name = "dqiv81ppt2ffj.cloudfront.net"
Using the URL of our distribution dqiv81ppt2ffj.cloudfront.net from output we can access the website. It should look like this:
To destroy the deployment run:
terraform -chdir=iaac destroy
Afterward
In the article, we deployed the simple static web application and distributed it using AWS CDN service CloudFront. We made some simplifications and going to improve the deployment in the future.
If you have any suggestions for improvement or topics, or any questions don’t hesitate to reach me in the comments 👇😊.